Fashion
Chic & Trendy Short Almond Nails – Designs, Colors & Care

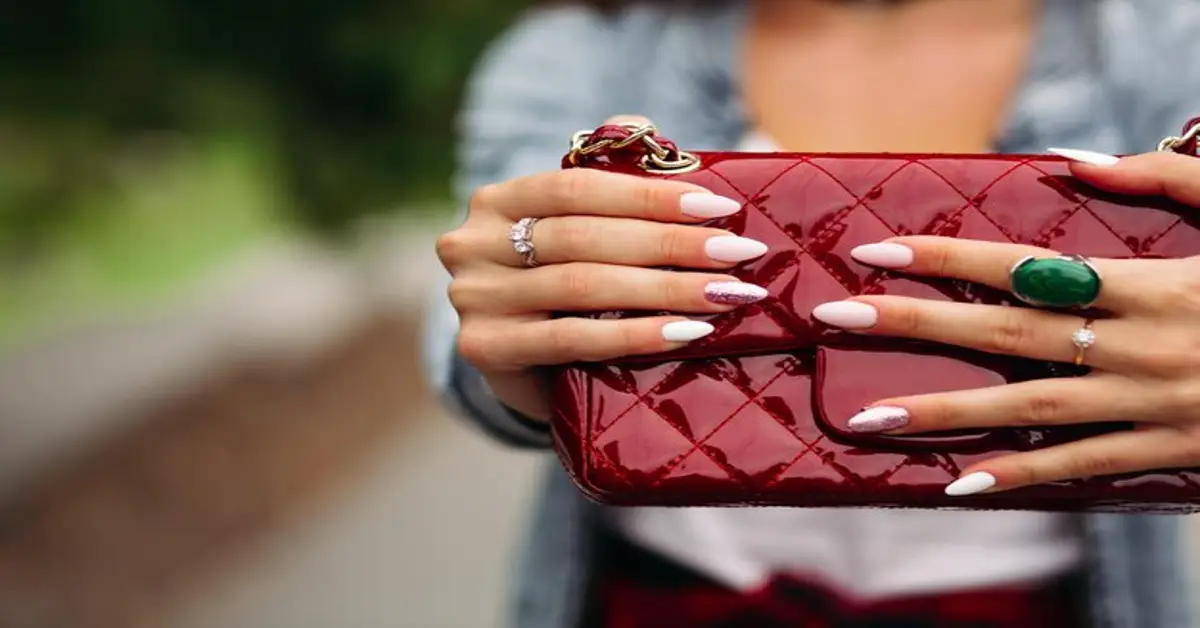
Short almond nails have taken the beauty world by storm, captivating nail enthusiasts everywhere. These elegant shapes offer a perfect blend of chic sophistication and playful charm. Whether you’re heading to a formal event or just want to elevate your everyday look, short almond nails can do it all.
With their gracefully tapered tips and versatile designs, these nails are not only stylish but also practical for daily wear. If you’re curious about how to flaunt stunning short almond nails that turn heads, you’re in the right place! Get ready to explore unique inspirations, trendy colors, artistic ideas, essential care techniques, and a step-by-step guide that will help you achieve this must-have manicure style. Let’s dive into the beautiful world of short almond nails together!
Inspiration for Short Almond Nails
When it comes to short almond nails, inspiration is everywhere. Whether you’re scrolling through social media or flipping through fashion magazines, there’s no shortage of stunning designs that catch the eye. The unique shape offers a canvas for creativity while remaining practical and elegant.
One popular trend is incorporating soft pastels into your nail art. Colors like lavender, mint green, and baby pink create a fresh look that’s perfect for spring or summer events. Pair these shades with minimalistic designs for an effortlessly chic vibe.
For those seeking something bolder, geometric patterns are all the rage. Think sharp lines and contrasting colors that play off each other beautifully. This modern twist on nail design adds an edgy flair without overwhelming the short almond shape.
Floral designs also shine on short almond nails. Delicate flowers painted in soft hues can give your manicure a romantic feel, making it ideal for weddings or special occasions. You can mix tiny blossoms with negative space to keep it trendy yet understated.
Consider metallic finishes or shimmer accents to elevate your style further. Golds and silvers reflect light in captivating ways while adding sophistication to any outfit you wear.
Unique Nail Designs
When it comes to short almond nails, unique designs can elevate your style. Consider incorporating geometric patterns for a modern twist. Triangles, stripes, and chevrons in contrasting colors create a striking visual impact.
Floral motifs are another fantastic option. Delicate blossoms painted on a nude base bring freshness to your look. You can choose tiny daisies or bold roses—whatever fits your personality best.
For those who love sparkle, think about adding glitter accents. A sprinkle of glitter at the nail tips or a full glitter gradient adds glam without overwhelming the design. It’s an easy way to dress up any outfit.
How about mixing textures? Matte finishes combined with shiny topcoats offer depth and interest. Imagine pairing matte black almond nails with glossy gold foil details for an eye-catching effect that stands out.
Don’t shy away from negative space designs either. Leaving parts of the nail bare while painting other sections creates intrigue and sophistication—a chic choice for any occasion!
Trendy Nail Colors and Designs
When it comes to short almond nails, color choice can make all the difference. One of the hottest trends right now is muted pastel shades. Soft pinks, lilacs, and mint greens offer a chic yet understated look that complements any outfit.
Bold jewel tones also have their moment in the spotlight. Rich burgundies, deep blues, and emerald greens add drama to your manicure. These colors are perfect for those who want their nails to stand out without being too over-the-top.
For an edgy vibe, consider incorporating metallic finishes or holographic designs. A shiny silver or gold adds glamour while keeping things modern. Pair these with simple nail art for a sophisticated touch.
Ombre effects are another trendy option worth exploring. Blending two complementary colors on short almond nails creates a unique gradient that draws attention without overwhelming your style.
Don’t shy away from seasonal themes! Earthy tones in autumn or vibrant hues in summer can reflect the mood of the season beautifully while keeping your look fresh and relevant. Embrace new ideas; there’s no limit to what you can create with short almond nails!
Nail Art Ideas
Nail art is where creativity meets style, especially for short almond nails. The unique shape provides a lovely canvas to express your personality. From simple designs to intricate patterns, there’s something for everyone.
Geometric patterns are a trendy choice this season. Think lines and shapes that play with negative space for an edgy look. You can mix colors or stick to monochrome shades for a more sophisticated vibe.
Floral accents never go out of style. Tiny blossoms painted delicately on one or two nails add a touch of femininity without overwhelming the overall design. Choose soft pastels or vibrant hues depending on your mood.
Another popular idea is the ombre effect. Blend two shades seamlessly from base to tip for stunning results. This technique works well with both bold and muted tones, allowing you endless options.
For those who love sparkle, consider adding glitter details! A sprinkle at the cuticle line or as an accent nail can elevate your manicure instantly. It’s all about finding what resonates with you while making sure it suits your lifestyle too.
Tips and Tricks for Short Almond Nails
To make the most of your short almond nails, start with a solid base. Apply a high-quality base coat to protect your natural nails and create a smooth surface for polish application. This step enhances longevity and prevents chipping.
Choosing the right shape is crucial. Almond nails should taper gently towards the tip, creating an elegant silhouette. If you’re not confident in shaping them yourself, consider visiting a professional nail technician who can help achieve that perfect look.
When it comes to colors, opt for shades that complement your skin tone. Neutral colors work well for everyday elegance while bold hues add excitement to special occasions. Don’t shy away from experimenting; sometimes unexpected combinations can yield surprising results.
Nail art adds personality without overwhelming short almond shapes. Stickers or simple geometric patterns can elevate your look effortlessly without requiring extensive time or skill in nail design.
Keep those cuticles healthy! Regularly moisturizing will prevent hangnails and promote overall nail health. A little maintenance goes a long way in keeping your short almond nails looking pristine and polished at all times.
Nail Care and Maintenance for Short Almond Nails
Maintaining short almond nails requires a bit of dedication. Regular upkeep ensures they look fabulous and stay healthy. Start by keeping your nails clean to prevent any buildup of dirt or bacteria. A gentle nail brush works wonders for this.
Moisturizing is crucial for both your skin and nails. Use a nourishing cuticle oil or cream daily to keep the cuticles hydrated and soft. This simple step can promote growth and prevent hangnails, which are the last thing you want when showcasing stunning short almond nails.
Filing is another essential aspect of maintenance. Keep your nails shaped perfectly by filing them gently in one direction rather than back-and-forth motions. This helps avoid splitting or breaking, ensuring that your desired almond shape remains intact.
When it comes to polish removal, be gentle as well. Opt for an acetone-free remover to minimize damage while taking off polish after a week or so of wear… Keeping polish on too long might lead to discoloration.
Consider scheduling regular manicures every few weeks at home or with a professional nail technician who understands how to care specifically for short almond shapes.
Step-by-Step Guide to Achieving Short Almond Nails
Achieving stunning short almond nails is easier than you think. Start by gathering the necessary tools: a nail file, buffer, cuticle pusher, and your chosen nail polish.
Begin with clean hands. Trim your nails to a manageable length if needed. Use the nail file to shape them into an almond form—this means rounding off the tips while maintaining some width at the base for that signature look.
Once you’re satisfied with their shape, gently push back your cuticles to give your nails a neat finish. Buff the surface of each nail lightly; this helps in achieving smooth polish application.
Next comes applying a base coat. This step not only protects your natural nails but also allows for even color distribution later on. After letting it dry, apply two coats of your favorite shade or design carefully; thin layers work best for even coverage.
Finish with a top coat for shine and durability—don’t forget those edges! Allow ample time for drying before doing any tasks that might smudge your masterpiece.
With practice and patience, you’ll soon master creating beautiful short almond nails that turn heads wherever you go.
Fashion
Snake Tattoo Guide: Meaning, Designs & Aftercare Tips

Some have said snake tattoos are some of the most fascinating tattoos to behold for some tattoo aficionados overtime-their long bodies, deep symbolism, and good looks tell stories that are as varied as the people who wear them. Whether you’re interested in them because they signify change or because you love how they seem to slither on your skin, caring for your snake tattoo is important to keep it alive and well for many years.
This guide will cover everything from the perfect design choice to ensuring those pieces of art stay beautiful for many years. So, if you are ready to bring out your inner serpent and shine those scales brighter, let us see how to keep nurturing the beautiful artwork!
Understanding Snake Tattoos
Snake tattoos have a long-standing history and vary in meaning from one culture to another. For many cultures, snakes are symbols of transformation and renewal as they shed their skin. This shedding serves as a powerful metaphor for personal growth, making snake tattoos popular with those who are celebrating changes in their lives.
Snakes, along with transformation, are symbols of wisdom and higher knowledge. In many mythological contexts, they act as guardians of ancient wisdom and symbols of enlightenment. This duality, in turn, can invite many people to identify with the idea.
With that, there is an endless list of possibilities of designs for snake tattoos. They could go the full-color approach, or they could settle for simple black line work-never-the-less-your snake tattoo can carry your individual taste. It can coil around flowers or twist itself together with skulls or mandalas; every tattoo tells its own story.
On its part, the culture contributes to the luring factor of snake tattoos. For instance, snakes symbolize protection and fertility within Eastern faiths like Hinduism and Buddhism. Western interpretations, meanwhile, may consider them dangerous or tempting.
All these layers enrich the consciousness surrounding choosing the snake tattoo. Whether it is in great form or symbolically-whether perhaps both classically symbolically interesting creature, it has got endless inspiration to offer bordering on the skin.
Choosing the Right Design
Differences in choosing one snake tattoo from another are an important landmark. From rebirth to danger, there are many meanings to be attributed to a snake. Choose which of these personal meanings reflects best upon you. Look up the major styles out there: traditional, watercolor, neo-traditional.
Consider size and placement on your body. A big piece can wrap around limbs, while small designs may suit the wrist or ankle. Depending on placement, you may see it regularly or hardly at all, but others may comment on it.
And let’s not forget about colors! Snakes are found in all kinds of colors. Bright green and yellow make statement pieces, while black and grey have a classic edge. Pick colors that complement each other, of course!
Don’t forget about color options! Snakes come in a variety of hues in nature; vibrant greens and yellows make bold statements while black and gray offer a more classic look. Choose colors that complement each other and reflect your personality.
Custom designs are also worth considering if you’re looking for something unique. Work with an experienced tattoo artist who understands symbolism and artistry to create a one-of-a-kind piece just for you.
Take inspiration from history or mythology surrounding snakes. From ancient cultures to modern interpretations, there’s a rich tapestry of stories that can inform your design choice, making it even more meaningful in the long run.
Preparing for and Getting Your Snake Tattoo
Preparing for your snake tattoo is a crucial step in ensuring you get the best results. Begin by researching reputable tattoo artists who specialize in this type of design. Look at their portfolios to find an artist whose style resonates with what you envision. Read reviews and ask for recommendations from friends or online communities.
Once you’ve chosen an artist, schedule a consultation. This is your chance to discuss ideas, placement, and size. Bring reference images that inspire you but also be open to your artist’s suggestions. They can provide valuable insights on how the design will look on your skin.
On the day of your appointment, make sure you’re well-rested and hydrated. Avoid alcohol or any blood thinners that could interfere with the process. Wear comfortable clothing that allows easy access to the area where you’ll be getting inked.
Arrive slightly earlier than scheduled so you can relax before starting. This helps ease any nerves and gives you time to go over final details with your artist if needed. Don’t hesitate to voice any concerns during this time; clear communication ensures everyone is on the same page.
During the session itself, focus on staying calm and still as much as possible. Remember that it’s okay to take breaks if necessary—your comfort should always come first while creating a stunning snake tattoo that reflects your individuality.
Aftercare Tips for Your New Snake Tattoo
Proper aftercare is really important after getting a snake tattoo to ensure that it eventually heals in good quality. The first thing to do is leave your bandage on as long as your artist recommends- at least for a couple of hours- so that the fresh ink is protected from bacteria and irritation.
On removing the bandage, the first thing to do is gently wash the area under lukewarm water and mild soap. Don’t scrub; just use your hands in a soft motion. Pat it dry with a clean towel-don’t rub! Keeping this area clean will help prevent infections.
Apply a thin layer of unscented moisturizer or specialized tattoo ointment. Using certain products especially made for tattoos would work well because they heal and do not cause harm to the skin. For several times on a day, repeat this, but do not over-moisturize.
In fact, about two weeks are the healing period of time. Do not soak your tattoo in pools or hot tubs during this period. The introduction of harmful bacteria through swimming with open dermis will definitely compromise the vibrancy of your design.
Every urge to pick at the scabs or peel at the healing skin should be ignored. These layers will naturally fall off, ensuring that the integrity of your snake tattoo is maintained while still looking amazing for the long haul.
Long-Term Care and Maintenance
Long-term care is crucial for keeping snake tattoos looking fresh and bright. Keeping them away from the sun is key. UV rays can cause fading, so applying sunscreen on exposed tattoos while in the sun is necessary. A broad-spectrum SPF 30 or higher will protect your artwork from unfavorable effects.
Hydration enhances the elasticity of your skin as well. Water is your best friend in keeping healthy skin that allows the tattoo to sit well over time. Moisturizers with shea butter or coconut oil can also be helpful here.
Exfoliation can also help preserve your snake tattoo. A gentle scrub of the area around the tattoo for a maximum of once a week is effective for the removal of dead skin without irritating the new ink. Make sure the exfoliant is apt for sensitive skin to prevent any complications.
Whatever you do, leave any scabs alone; picking at them will only accelerate damage to the ink and surrounding skin in the long run. Letting blemishes heal naturally will allow you to shine in your design.
Schedule the odd refresh at a reputable artist’s studio every two years if you notice fading or wearing in specific areas. A quick fix can help your snake tattoo sparkle once again and look great for years.
Touching Up and Enhancing Your Snake Tattoo
With time, your snake tattoo may require a touch-up now and then to retain its beauty. Fading is a natural phenomenon-a constant in the world of tattoos: due to sun exposure, skin changes, or just the passage of time. It is time to retouch when you see a design losing its vibrancy or sharpness.
Finding someone who really knows tattoo restoration is important. The Tattoo artist should know how to touch up the tattoos without changing too much of the original design. Part of the restoration process could be reinforcements of the background colors or adding additional colors to bring back the contrast of the old lines.
Prepare well for the retouch session, taking care of skin condition and hydration. Keeping skin hydrated ensures ink absorption and an excellent result. The more water you drink before your appointment, the better.
You might want to consider building upon this evolution by including designs that go along nicely with your snake tattoo! Flowers, geometric motifs, or other symbols of significance to you could take it even further! These additions to the tattoo breathe fresh air into it while simultaneously creating something that is very much unique to you.
Proper aftercare is a must now again for anything that has been added. Treating your fresh ink well ensures longevity and that those bright and fresh colors shine.
Doing periodic maintenance of how your snake tattoo looks through time is important in making sure that it is still beautiful and relevant in your life- just as beautiful as the day it was born!
Fashion
Stunning Braid Hairstyles for Every Hair Type and Length

Indeed, braid hairstyles are eternal. Old traditions and modern glamour runways recognize braid hairstyles as evergreen in the beauty and culture worlds. There are countless braids for every occasion, from a protective style to a polished updo as well as an everyday, fun hairstyle. This guide will cover the best braid hairstyles, what looks good for your hair type, tips on styling, and much more.
You might be wondering, why such huge popularity of Braid Hairstyles?
Braid is a combination of useful utility and aesthetics. It is really fashionable and easily manageable. Besides that, it’s a great damage protection measure against heat or harsh weather. They carry meanings as well: African heritage, Viking warriors, and boho-chic festival scenes.
They include:
Laxity, in terms of styling.
Suitable for all types of hair.
Options versatile for any occasion.
Best for protective styling.
Types of Braid Hairstyles
Let us explore the most popular and loved braid styles that continue to rule everyday fashion and red carpets with strong competition.
Box Braids
This is a classic-style protective hairstyle that is very famous for people with natural or textured hair. To make box braids, the hair is divided into squares, and each piece is braided from the roots to the ends.
LSI keywords: knotless braids, jumbo box braids, small box braids
French Braids
This elegant braid is also known as the three-strand braid, which starts with the crown and clothed very close to the scalp. Suitable for informal and formal events.
Dutch Braids
People typically refer to such hair as reverse French braids; in fact, they pop out because they look prominent. This is an all-time favorite for those who spend most of their time at the gym and sporty look.
Cornrows
Cornrows are tightly braided along the scalp to form rows, thus being highly stylish and cultural besides serving for protective styling purposes.
Variations include:
Straight-back cornrows
Zigzag patterns
Feed-in cornrows
Fishtail Braids
They are made by dividing the hair into two sections and weaving small pieces from each side alternately. This one is perfect for formal occasions or Instagram-worthy styles.
Crown Braid
Best for weddings or summer picnics. The braid then wraps around the head like a halo and gives a very romantic and royal feel.
Waterfall Braids
A stunning half-up half-down style that creates bangs as you braid but leaves pieces out that cascade down like a waterfall.
With Best Braid Hairstyles for Every Hair Type
You can easily define an ideal braid for being locked in place, crisply visible, and manageable according to your very own texture.
For Curly Hair:
Best Styles: Box Braids, Flat Twists, Goddess Braids
Leave-in conditionerer before you braid, so moisture is preserved.
For Straight Hair:
Best Styles: French, Dutch, Fishtail
Use texture spray to hold braids in place and keep them from slipping.
For Fine Hair:
Crowns are fine styles or waterfalls that build volume.
Pancaking (loosening the braid) creates the effect of fuller hair.
For Thick Hair:
Be bold enough to sport jumbo box braids or double Dutch braids.
Use sectioning clips for handling hair while styling.
Braid Hairstyles by Hair Length
You don’t need waist-length hair to enjoy braids. Here’s how to make it work for your length.
Short Hair
- Options: Mini cornrows, finger coils, braided bangs
- Tip: Add hair extensions for fuller looks like box braids or twists.
Medium Hair
- Options: Half-up Dutch braids, halo braids, braided ponytails
- Ideal for most styles without added hair.
Long Hair
- Options: Layered fishtail, crown braids, feed-in braids
- Long hair allows more creativity with patterns and length-based styles.
African Hair Braid Styles
Decorative styles not only prevent breakage but also assist natural hair to fasten growth and protect it from the environmental factors.
Top Protective Braid Hairstyles:
Box braids
Senegalese twists
Marley twists
Flat Twists
Cornrow Extensions
Care tips:
Regularly moisturize your scalp
Sleep in a satin or silk scarf
Do not keep braids on for over 6 to 8 weeks
Braid for Special Occasions
Braid up your hair for special occasions such as wedding ceremonies, proms, and corporate galas.
Stylish braid hairstyles:
Bohemian beads accessories braids
Side fishtail pearls
Crown braid updos
Braided low buns with veil attachments
Styling tip: For more glam, use braid cuffs, jewels, or fresh flowers.
How To Maintain Braids
Having a superb braid today does not guarantee a stunning look tomorrow-unless maintained well.
Gab Maintenance Checklist:
Clean scalp: Use a dry shampoo or diluted apple cider vinegar spray
Hydration: Light oil, such as (argan, jojoba) on scalp
Control Frizz: Refreshing mousse or braid sheening spray
Overnight Protection: Sleeping in satin scarf or bonnet
Homemade and professional tips for braid diy
Are you not a braiding professional, then just work your way around the simple and easy ones. You don’t have to go to a saloon to achieve an amazing braided style.
Equipment templates:
Rat-tail comb
Sectioning clips
Edge control gel
Detangling brush
Bobby pins
Beginner Braids:
Three-strand basic braid
Side braid
French braid
Half-up braid crown
Pro Tip: Watching tutorials on YouTube or TikTok can fast-track your learning.
Conclusion: Find Your Perfect Braided Look
Whether you’re rocking a crown braid for a wedding or quick cornrows for daily wear, braid hairstyles offer endless variety, practicality, and beauty. With the right technique and maintenance, braids can be both stylish and protective. Don’t be afraid to experiment—your perfect braid might just be the next one you try!
FAQ About Braid Hairstyles
Q1: How long should I keep my braids in?
A: Most protective braid styles can last 4–8 weeks, depending on hair type and care.
Q2: Do braids damage hair?
A: Not if done properly. Avoid tight braiding, over-manipulation, and always moisturize.
Q3: Can I swim with braids?
A: Yes! Just rinse hair afterward and moisturize to prevent dryness from chlorine or saltwater.
Q4: Are braids suitable for formal events?
A: Absolutely. Many braid styles like crown braids, updos, and fishtails are perfect for weddings, proms, or galas.
Q5: How do I stop my braids from frizzing?
A: Use anti-frizz spray, avoid excessive water exposure, and sleep with a silk scarf or pillowcase.
Fashion
Hair Transplant Cost: Pricing, Factors & What to Expect

Hair loss affects millions of people worldwide, leading many to consider a hair transplant as a permanent solution. But one of the most common questions is: How much does a hair transplant cost? The price varies depending on several factors, including the type of procedure, clinic location, and the extent of hair loss. In this guide, we’ll explore the costs, influencing factors, and what to expect from the procedure.
How Much Does a Hair Transplant Cost?
The cost of a hair transplant typically ranges between $4,000 and $15,000 in the United States. However, prices can be lower in countries like Turkey and India, where high-quality procedures are available at a fraction of the cost.
Average Hair Transplant Costs by Country
Country | Average Cost (USD) |
---|---|
USA | $4,000 – $15,000 |
UK | $5,000 – $12,000 |
Turkey | $1,500 – $5,000 |
India | $1,000 – $4,000 |
Canada | $6,000 – $14,000 |
Australia | $5,500 – $13,000 |
Factors That Influence Hair Transplant Cost
1. Type of Hair Transplant Procedure
There are two primary types of hair transplant methods:
- FUE (Follicular Unit Extraction): Individual hair follicles are extracted and implanted. Less scarring, but more expensive.
- FUT (Follicular Unit Transplantation): A strip of scalp is removed and implanted. More affordable but leaves a visible scar.
2. Number of Grafts Needed
Hair transplant costs are often calculated per graft. On average, a single graft costs between $2 and $10, and patients typically need between 1,000 to 4,000 grafts, depending on their level of hair loss.
3. Surgeon’s Expertise and Reputation
Experienced, board-certified surgeons charge more due to their expertise and success rates. A highly skilled surgeon can deliver natural-looking results, making the investment worthwhile.
4. Clinic Location
Clinics in major cities and developed countries generally charge more due to higher operational costs. Many people travel to countries like Turkey for affordable yet high-quality procedures.
5. Additional Costs
Aside from the procedure, you may incur costs for:
- Consultations
- Pre-operative tests
- Post-surgery medications
- Follow-up sessions
Are Hair Transplants Covered by Insurance?
Most insurance companies do not cover hair transplants as they are considered cosmetic procedures. However, medical financing options and payment plans are available at many clinics.
Is Traveling Abroad for a Hair Transplant Worth It?
Many people opt for medical tourism in countries like Turkey, where clinics offer packages that include:
- The hair transplant procedure
- Hotel accommodation
- Airport transfers
- Post-surgery care
This can significantly reduce costs while ensuring high-quality results.
Conclusion
The hair transplant cost varies widely based on location, procedure type, and surgeon expertise. While it can be expensive, the long-term benefits often outweigh the costs. If you’re considering a hair transplant, research reputable clinics and consult with specialists to determine the best approach for you.
Frequently Asked Questions (FAQ)
1. How long does a hair transplant last?
A successful hair transplant is permanent, as transplanted hair follicles continue to grow naturally.
2. Is the procedure painful?
Hair transplants are performed under local anesthesia, making them virtually painless. Some discomfort may occur post-surgery.
3. How soon will I see results?
New hair growth starts around 3-6 months post-procedure, with full results visible in 12-18 months.
4. Can women get hair transplants?
Yes, hair transplants are effective for both men and women experiencing hair loss.
- Entertainment3 months ago
JavRank: Your Ultimate Guide to JAV Entertainment
- Entertainment4 months ago
The Iconic MF DOOM Mask: Symbol of Anonymity and Artistry
- Education4 months ago
20C to F Conversion : Celsius to Fahrenheit Formula
- Entertainment2 months ago
The //Vital-Mag.net Blog: Your Guide to Holistic Wellness
- Lifestyle3 months ago
CumOnPrintedPics: Memories into Personalized Keepsakes
- Business2 months ago
Fintechzoom.com DAX40: Insights & Investment Tips
- Lifestyle2 months ago
The://Vital-Mag.net Blog: Ultimate Health and Wellness Guide
- Uncategorized4 months ago
LessInvest.com crypto: Simplifying Investment for All